Rain Barrels 101: Tools You Need to Start Harvesting Rainwater
In an era where sustainability and resource management are at the forefront of homeownership, rainwater harvesting has emerged as a cornerstone of the eco-conscious garden. For many, the journey begins with a single rain barrel. While the concept—capturing runoff from your roof to water your landscape—is ancient, modern tools and techniques have made it more efficient and accessible than ever before.
By integrating a rainwater system into your “total garden gear,” you not only reduce your reliance on municipal water but also provide your plants with chlorine-free, ambient-temperature water that they naturally crave. This guide outlines the essential tools and steps required to establish your first rainwater harvesting station.
Why Harvest Rainwater?
Before diving into the toolkit, it is essential to understand the “why.” Beyond the obvious reduction in utility bills, rain barrels mitigate local drainage issues. By capturing peak flow during heavy storms—common in tropical regions like Penang—you reduce the volume of runoff that can erode soil or overwhelm local sewer systems. Furthermore, rainwater is slightly acidic, which helps maintain the ideal pH balance for soil health in most vegetable patches and flower beds.
The Essential Rainwater Harvesting Toolkit
To build a professional-grade system that is both functional and durable, you will need the following specialized tools and components:
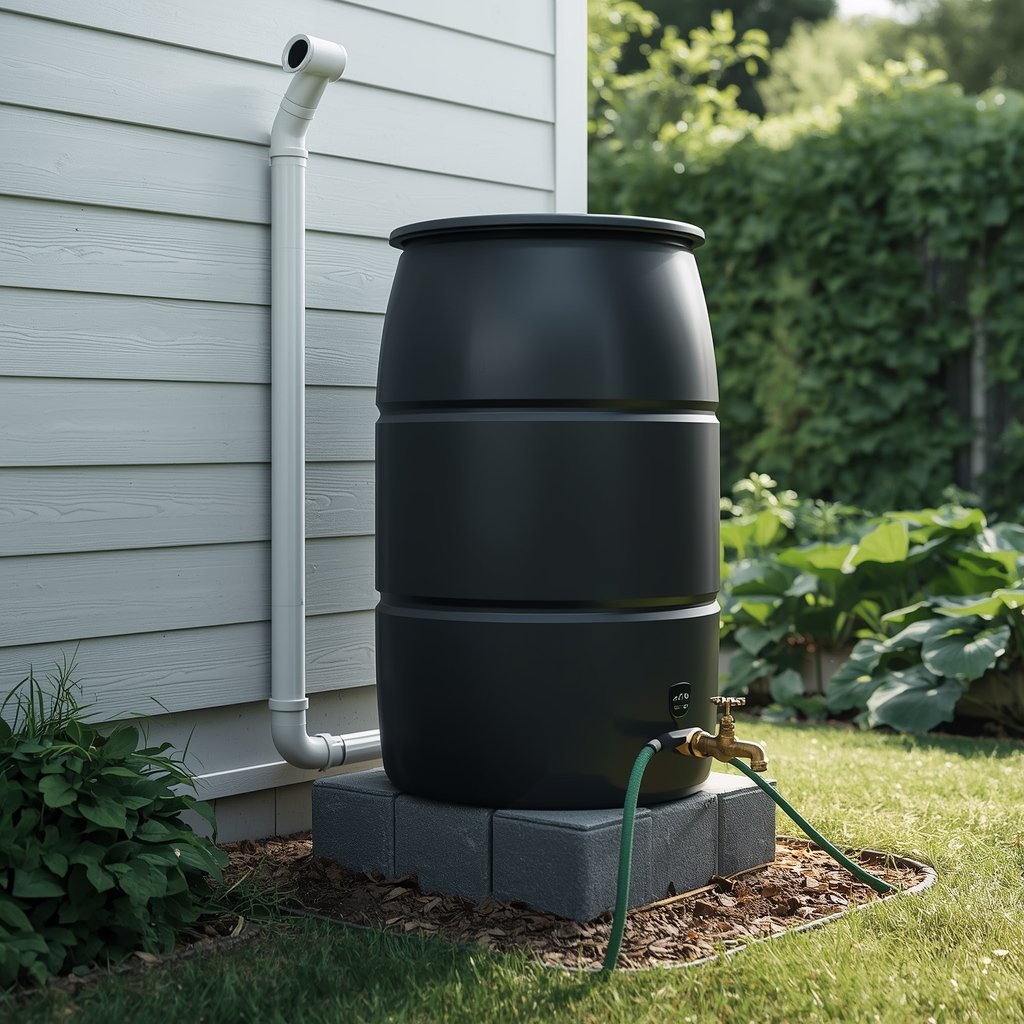
1. The Rain Barrel (The Reservoir)
The heart of the system is the barrel itself. While any large, food-grade container can work, dedicated rain barrels often feature:
-
UV-Stabilized Plastic: To prevent the material from becoming brittle under the intense Malaysian sun.
-
Dark Coloration: To block sunlight and prevent algae growth within the water.
-
A Sealed Lid: Critical for preventing debris from entering and, more importantly, keeping mosquitoes from breeding.
2. The Downspout Diverter
A diverter is the most important “smart” component of your setup. Instead of simply cutting your downspout and shoving it into the barrel, a diverter is installed into the existing pipe.
-
Automatic Overflow: Once the barrel is full, a diverter automatically sends excess water back down the main downspout, preventing your house foundation from becoming waterlogged.
-
Debris Filtering: High-quality diverters include a “first flush” or screen mechanism to keep leaves and roof sediment out of your storage.
3. Leveling and Elevation Tools
Water pressure in a rain barrel is driven by gravity. To ensure your heavy-duty watering wand or drip irrigation kit works effectively, the barrel must be elevated.
-
Cinder Blocks or a Sturdy Stand: Raising the barrel 12 to 18 inches off the ground provides the necessary pressure to use a hose and makes it easier to fit a watering can under the spigot.
-
A Spirit Level: A full 50-gallon barrel weighs over 400 pounds. Ensuring the base is perfectly level prevents the barrel from tipping over and causing property damage.
4. High-Flow Spigots and Connections
Standard plastic spigots are prone to leaking over time. For long-term reliability, consider:
-
Brass Ball Valves: These offer a more secure seal and allow for a higher flow rate than plastic gate valves.
-
Standard Hose Threading: Ensure your spigot is compatible with your existing garden hoses and accessories.
Installation: A Step-by-Step Overview
-
Site Selection: Place your barrel near the downspout closest to the plants you intend to water most frequently.
-
Base Preparation: Clear the area and lay your cinder blocks or stand. Use your level to confirm the surface is flat.
-
Diverter Installation: Measure the height of your barrel and install the diverter into your downspout according to the manufacturer’s instructions.
-
Connecting the System: Link the diverter to the barrel intake using the provided tubing. Ensure all seals are tight to prevent leaks.
-
Safety Check: Ensure the overflow is directed away from your home’s foundation and that the barrel is securely positioned.
Maintenance for Long-Term Success
A rain barrel is not a “set-and-forget” tool. To keep it functional:
-
Clear Gutters Regularly: This prevents organic matter from clogging your diverter screen.
-
Inspect for Mosquitoes: Check that the intake screen is intact and consider using “mosquito dunks” (Bti) as an added precaution in humid climates like Jelutong.
-
Seasonal Flushing: Once or twice a year, empty the barrel completely and rinse out any fine sediment that has settled at the bottom.
Conclusion
Starting a rainwater harvesting project is a rewarding way to upgrade your gardening capabilities. By assembling the right tools—from a UV-stabilized barrel to a high-quality diverter—you create a resilient system that supports your landscape while respecting the environment. As you expand your “total garden gear,” your rain barrel will serve as the sustainable foundation for all your watering needs.